
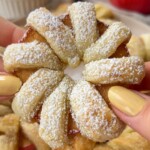


This easy vegan pavlova is the perfect light and sweet deliciousness that’s just like the traditional version. Vegan meringue bakes at a low temperature to achieve that delicate crispiness on the outside and slightly soft, chewy inside. The pavlova is then topped with vegan cream cheese and fresh fruits to finish it all up.

Ever since aquafaba became a thing a few years back, vegans around the world were excited at all the possibilities it presented for vegan cooking. If you ask me, it is right up there on my list of favorite vegan ingredients to cook with. Of course, I couldn’t resist trying to use in a vegan take on this classic dessert.
Some other recipes to try are my vegan tiramisu or whip up my favorite white chocolate lava cakes for satisfying my sweet tooth.
Why You’ll Love This Vegan Pavlova Recipe
- Sweet and delish: The delicate sweetness and the soft marshmallow-y middle are the perfect combination. You’ve got to try this!
- Easy to make: Pavlovas may seem like they need a lot of effort and brainwork to get right, but that’s actually not the case. Making this aquafaba pavlova is really easy.
- Perfect for holidays: If you’re looking forward to making a fancy-looking dessert for the holidays, this easy vegan dessert will be just perfect.
Ingredients
- Aquafaba: This one’s the secret ingredient that allows you to get that perfect fluffy meringue without egg whites. Aquafaba is actually just the liquid that you’d find in a can of chickpeas (or any other legumes).
- Sugar: To sweeten it, of course!
- Vanilla: For that delicate sweet aroma.
- Cornstarch: To give the pavlova that melt-in-the-mouth texture and to help it get that bit of structure.
- Cream of tartar: Cream of tartar brings that bit of acid to the mixture, which acts as a stabilizer in this recipe.
- Vegan cream cheese: I love using my homemade vegan cream cheese here in the pavlova topping, but you could totally use any store-bought version too, if that’s what you prefer.
See the recipe card below for exact ingredient amounts, nutritional information, and detailed instructions.
Variations
- Topping time: Whipped coconut cream, rose syrup, fresh tropical fruits, mixed berries, and chocolate shavings are some good options to use as toppings.
- Strawberry filling: Use my dairy-free strawberry cream cheese for the filling instead of the regular one to get a bit of a different flavor.
- Citrusy flavor: If you’re making this as a summer dessert and want a bit of citrusy flavor, you can add some lemon or orange zest into the topping mixture as well.
How to Make Vegan Pavlova
To make the vegan pavlova, you’ll first need to preheat the oven at 225 F. You’ll also need to prep the baking sheets by lining them with some parchment paper.

Step 1: Whip whip: Measure out 120g of aquafaba into a large bowl. Whisk it on high speed for 7-10 minutes using a stand mixer, until stiff peaks form.

Step 2: Prepare the mixture: Slowly add 1 tablespoon of sugar into it while whisking it, followed by the vanilla. Turn off the mixer and fold in the cornstarch.

Step 3: Pipe time: Transfer this vegan meringue into a large piping bag and begin piping the mini pavlovas onto the baking sheet. First, form a flat layer on the bottom, then start building up a sort of wall of meringue so that the final result looks a little bit like a nest.

Step 4: Bake and cool: Pop the baking sheets into the oven and let the pavlovas bake for 1 hour and 15 minutes. Turn off the oven and let them stay in for another 30 minutes.
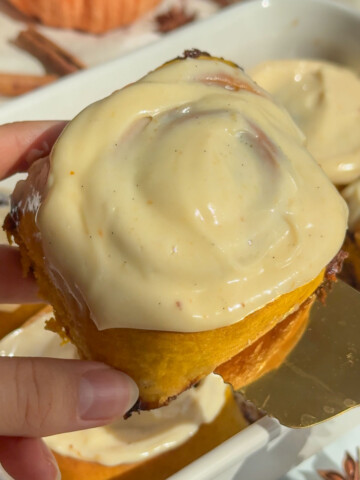
Step 5: Make the filling: In another bowl, whisk the vegan cream cheese, sugar, vanilla and a pinch of salt until you get a smooth mixture.
Step 6: Assemble: Get the pavlovas out and pipe the filling on the top. Finish up with some fresh berries and serve immediately.

⭐️ Hint: Make sure you leave enough room between each pavlova when you’re piping them on the baking sheet.
Storage Directions
- Storing: To store your leftover egg free pavlova, transfer it to an airtight container and let it stay at room temperature. It should stay good for a couple of days.
- Refrigeration: I wouldn’t recommend refrigerating this, as it can cause condensation, which can get your vegan pavlova to become soggy. This also applies to freezing!
Serving Suggestions
In Australia and New Zealand, a light and delicate pavlova is usually served as a dessert in the hot summer months, and that’s what I love doing too.
The simple sweetness and fruitiness of this dessert is the perfect end to a summer meal of vegetable quinoa paella or this orzo salad.
And of course, you can also serve this delicious vegan pavlova as a holiday dessert or when you’re entertaining guests. I love whipping up my gluten-free hummus and vegan cashew queso to serve along with my chips, veggie sticks and crusty bread as everyone arrives.
Expert Tips
- Use a stand mixer: You’ll need to whip the aquafaba vigorously for this recipe, which is why, using a stand mixer is your best bet. You can also use an electric mixer. I do not recommend mixing by hand because it will take a lot of time and effort, but it's definitely possible!
- Add gradually: Remember to gradually add the sugar, only after the stiff peaks have formed. This will ensure that the pavlova retains its glossy shine and stays fluffy too.
- Be patient: Resist the urge to peek in, and leave that oven door alone! Remember that the pavlova needs to stay in there for 30 minutes or more to get to that perfect crispy outside.
- Top at the right time: Wait until you’re just ready to serve to top the pavlova; whether it is fresh fruit or whipped cream, so that it doesn’t end up soggy.
Video
Recipe FAQs
High oven temperature can cause a pavlova to crack. Make sure you stick to the low temperature I’ve recommended to get the perfect result. Using an oven thermometer to make sure the temperature of your oven is accurate is great if you have one!
Cracked pavlovas still taste amazing! If you want to hide the cracks, simply top some vegan whipped cream over it, right before you serve.

More Delicious Vegan Desserts


Vegan Pavlovas
Ingredients
Pavlova Ingredients
- 120 g aquafaba
- 1 cup granulated sugar 200 g
- 1 teaspoon vanilla
- 1 tablespoon cornstarch
- ½ teaspoon cream of tartar
Cream Filling Ingredients
- 1 cup vegan cream cheese
- ½ cup powdered sugar
- 1 teaspoon vanilla
- 1 pinch salt
Instructions
- Preheat the oven to 225F/ 110C.
- Drain the water from a can of chickpeas and measure out 120 g. Transfer the aquafaba to a stand mixer & whisk on high speed for 7-10 minutes, until the mixture has transformed into a white and fluffy meringue.
- The meringue should form stiff peaks at the end of the whisk attachment- that's how you know it's been whipped sufficiently.
- Once stiff peaks have formed, slowly start adding 1 tablespoon of sugar at a time to the whipped aquafaba. Also, add in the vanilla.
- Once you have added all of the sugar, turn off the stand mixer and fold in the cornstarch.
- Transfer the meringue into a large piping bag with a star piping tip and line two baking trays with parchment paper.
- Pipe the meringue onto the baking sheet, first forming a flat layer on the bottom, then start building up a sort of wall of meringue so that the final result looks a little bit like a nest.
- Pipe the rest of the mini pavlovas, making sure to leave enough room between each one. You should get about 10 mini pavlovas and you will probably need two baking trays for this.
- Bake the pavlovas at 225F for 1 hour and 15 minutes. Then turn off the oven (without opening the door!) and let the meringue sit in the hot oven for another 30 minutes.
- While the pavlovas are baking, whisk together the cream filling ingredients and transfer the filling to a piping bag.
- Once the pavlovas have fully cooled off, pipe the filling on top, and finally, add some fresh berries on top.
Leave a Reply